Categories
Articles

ZEND AMF (Action Message Format) Minimalist Example Using RemoteObject and MySQL

I always liked and appreciated the AMFPHP implementation of Adobe Action Message Format. I have seen it implemented in some robust applications and it held its own. Among its best features is the browser which is very handy for testing. However Adobe has now gotten involved with Zend AMF and this is a quick shot at putting it together using the RemoteObject class.
The first example I looked at is from Lee Brimelow’s Introduction to ZendAMF at gotoAndLearn.com. This is a great example and worth the watch to get a rounded view of using Zend AMF. He uses NetConnection and Responder classes in Flash CS4. You can use his example in Flex and Air.

Adobe Flash Builder 4 and Flex 4 - Essential Training
Learn More About Flex 4

Eventually I put Zend AMF to practical use by revamping DefineIt.com to use it along with the Parsley framework.

Flash CS4 does not have a native RemoteObject class, so that leads us to using Flex.

Download files
You can build this with the free Flex SDK by using the code in the src folder. This example was built with Flex 4.

The following uses the code from the Flex example, but other than the Application and WindowedApplication tags the code is the same.

Application Class – ZendAMFRemoteObjectGetTable_Flex
Rather than use a services-config.xml file linked to the compiler line, I choose to include the channel information in the MXML. More on this method is detailed by Chris Callendar’s post Using Flex and AMFPHP without a services-config.xml file.

<?xml version="1.0" encoding="utf-8"?>
<!--
Demonstrates use of the RemoteObject to communicate with Zend AMF.
<p>Author: Lon Hosford https://www.lonhosford.com 908 996 3773</p>
-->
<s:Application xmlns:fx="http://ns.adobe.com/mxml/2009"
			   xmlns:s="library://ns.adobe.com/flex/spark"
			   xmlns:mx="library://ns.adobe.com/flex/mx" minWidth="955" minHeight="600">
	<fx:Declarations>
		<!-- Alternative to services-config.xml added to the compiler option services -->
		<s:ChannelSet id = "zend_amf_channel_set">
			<s:channels>
				<s:AMFChannel uri="{GATEWAY_URL}"/>
			</s:channels>
		</s:ChannelSet>
		<!-- MembershipService RemoteObject -->
		<s:RemoteObject	id="members_ro"
						destination="zend-amf"
						source="MembershipService"
						channelSet="{zend_amf_channel_set}"
						showBusyCursor="true"
						fault="membersError(event)">
			<s:method name="getAllMembers" result="getAllMembersResult(event)"/>
		</s:RemoteObject>
	</fx:Declarations>

[ad name=”Google Adsense”]
On line 33 you need to set the GATEWAY_URL to match your configuration. You might want to use a default file name such as index.php for the gateway script so you only need a path to the folder.

	<fx:Script>
		<!&#91;CDATA&#91;
			import mx.controls.Alert;
			import mx.events.FlexEvent;
			import mx.rpc.events.FaultEvent;
			import mx.rpc.events.ResultEvent;
			// &#91;ADD YOUR HTTP URL TO THE GATEWAY PHP SCRIPT&#93;
			private const GATEWAY_URL:String = "http://YOUR_DOMAIN/PATH_TO_GATEWAY SCRIPT/";
			/**
			 * Member value object. Not used in this example. Included for information only.
			 * Use this to convert the data received. In this example the DataGrid dataprovider
			 * property converted the incoming amf array to an ArrayCollection and we mapped
			 * using the DataGridColumn dataField property.
			 * */
			private var memberData:MemberData;
			&#91;Bindable&#93;
			private var lang_title:String = "Minimalist Zend AMF Example Using RemoteObject";
			/**
			 * Invoke RemoteObject members_ro getAllMembers method.
			 * */
			protected function getAllMembers():void
			{
				members_ro.getAllMembers();
			}
			/**
			 * Empties the member_dg DataGrid.
			 * */
			protected function clearDataGrid():void
			{
				member_dg.dataProvider = {};
			}
			/**
			 * RemoteObject members_ro ResultEvent handler for the remote getAllMembers method.
			 * <p>Data arrives as an array and dataProvider property converts to ArrayCollection.
			 * The member_dg DataGrid contains DataGridColumn to match the expected field using
			 * the dataField property.</p>
			 * */
			protected function getAllMembersResult(e:ResultEvent):void
			{
				member_dg.dataProvider = e.result; // ResultEvent result property is an array
			}
			/**
			 * RemoteObject members_ro default FaultEvent handler.
			 * */
			protected function membersError(e:FaultEvent):void
			{
				Alert.show(e.toString());
			}
		&#93;&#93;>
	</fx:Script>

[ad name=”Google Adsense”]
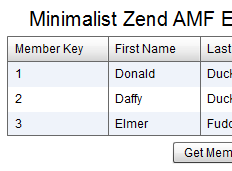
This is the UI. The member_dg DataGrid contains DataGridColumn to match the expected fields in the MemberData object using the dataField property. This is a one to one relationship, however you may find times where you need to construct your own fields such as a concatenation of first and last name and thus populate the DataGrid with your own collection object.

	<s:VGroup horizontalAlign="center" width="100%" paddingTop="25">
		<s:Label text="{lang_title}" fontSize="20"/>

		<mx:DataGrid  id="member_dg"  height="100">
			<mx:columns>
				<mx:DataGridColumn headerText="Member Key" dataField="memberKey" width = "100"/>
				<mx:DataGridColumn headerText="First Name" dataField="firstName"/>
				<mx:DataGridColumn headerText="Last Name" dataField="lastName"/>
				<mx:DataGridColumn headerText="Email Address" dataField="emailAddress" width="200"/>
			</mx:columns>
		</mx:DataGrid>
		<s:HGroup>
			<s:Button label="Get Members" click="{getAllMembers();}"/>
			<s:Button label="Clear" click="{clearDataGrid();}"/>
		</s:HGroup>
	</s:VGroup>

</s:Application>

MemberData Value Object Class for Actionscript
This is the value object on the client side to define the field names for a member object. This is mapped to the server side on line 37 of the Zend AMF gateway script.

package
{
	/**
	 * Value object defining the member data
	 * */
	[RemoteClass(alias="MemberData")]
	[Bindable]
	public class MemberData
	{
		public var memberKey:uint;
		public var firstName:String;
		public var lastName:String;
		public var emailAddress:String;
	}
}

Zend AMF Gateway PHP Script
This is the gateway program for the Zend Amf. This is the file that is referenced on line 13 of the MXML file. In this example it was named index.php.

<?php
/**
*  Sample Zend AMF gateway
*  @return Endpoint &#91;Zend Amf Endpoint&#93;
* */

// Configurable values
// Debugging values
$debug = true;                             // Debugging status
if ($debug)
{
	// Report all errors, warnings, interoperability and compatibility
	error_reporting(E_ALL|E_STRICT);
	// Show errors with output
	ini_set("display_errors", "on");
}
else
{
	error_reporting(0);
	ini_set("display_errors", "off");
}
// Add the Zend AMF installation folder to the include path.
// In this example the frameworks folder is a sibling folder to
// this application folder. The frameworks folder contains the Zend
// folder that is extracted from http://framework.zend.com/download/amf
ini_set("include_path", ini_get("include_path") . PATH_SEPARATOR . "..\\frameworks" );

// Instantiate the Zend Amf server
require_once 'Zend/Amf/Server.php';
$server = new Zend_Amf_Server();

// Register your service classes
require_once 'MembershipService.php';
$server->setClass("MembershipService");

//Map ActionScript value objects to the PHP value objects.
$server->setClassMap("MemberData", "MemberData");

// Return the handle.
echo ($server->handle());

?>

[ad name=”Google Adsense”]
MembershipService Class
This is the service class that contains remote methods. Generally a the database and business logic is delegated to another API you write. In this case they are all together for simplicity.

<?php
/**
*	Service class exposing the methods to deal with membership.
*   This example includes business logic for simplicity of study.
*/
require_once 'MemberData.php';
class MembershipService
{
	public function MembershipService()
	{
		// Connect to MySql database.
		// Supply your own MySQL access values.
		// These are defaults when running on your own private computer.
		mysql_connect("localhost", "root", "");
		// Select the database.
		// Supply your own database name.
		mysql_select_db("test");
	}
	/**
	*	Get all members and all fields.
	*/
	public function getAllMembers()
	{
		// Array of MemberData objects.
		$members = array();
		// Selecting all fields and all records from table.
		// Supply your own table name and optionally your own SQL statement.
		$result = mysql_query("SELECT * FROM zend_amf_members");
		// Assuming mysql_query success. Slog through records.
		while ($row = mysql_fetch_assoc($result))
		{
			// Create a MemberData value object and populate.
			$member = new MemberData();
			$member->memberKey = $row["memberKey"];
			$member->firstName = $row["firstName"];
			$member->lastName = $row["lastName"];
			$member->emailAddress = $row["emailAddress"];
			array_push($members, $member);
		}
		// Return the members array to client.
		return $members;
	}
}
?>

MemberData Value Object Class for PHP
This is the value object on the server side to define the field names for a member object. This is mapped to the client side on line 37 of the Zend AMF gateway script.

<?php
/**
 * Value object defining the member data
 * */
class MemberData
{
  public $memberKey;	// uint
  public $firstName;	// String
  public $lastName;		// String
  public $emailAddress;	// String
}
?>

SQL To Create Testing Table
The PHP script uses zend_amf_members for the table and this is the SQL to create that table. In this example the database was called test.

SET SQL_MODE="NO_AUTO_VALUE_ON_ZERO";

--
-- Database: `test`
--

-- --------------------------------------------------------

--
-- Table structure for table `zend_amf_members`
--

CREATE TABLE IF NOT EXISTS `zend_amf_members` (
  `memberKey` int(10) unsigned NOT NULL auto_increment,
  `firstName` varchar(30) NOT NULL default '',
  `lastName` varchar(30) NOT NULL default '',
  `emailAddress` varchar(50) NOT NULL default '',
  PRIMARY KEY  (`memberKey`)
) ENGINE=InnoDB DEFAULT CHARSET=latin1 COMMENT='Zend Amf Examples' AUTO_INCREMENT=7 ;

--
-- Dumping data for table `zend_amf_members`
--

INSERT INTO `zend_amf_members` (`memberKey`, `firstName`, `lastName`, `emailAddress`) VALUES
(1, 'Donald', 'Duck', 'quacker@pond.com'),
(2, 'Daffy', 'Duck', 'daft_2x@farm.org'),
(3, 'Elmer', 'Fudd', 'elmer.fudd@hunters.net'),
(4, 'Bugs', 'Bunny', 'whats_up_doc@underground.org'),
(5, 'Yosemite', 'Sam', 'varmint_chaser@forest.com'),
(6, 'Wile', 'Coyote', 'ceo@acme.com');
Categories
Articles

Adobe AIR NativeProcess Silent Print PDF with BioPDF’s Acrobat Wrapper

By Lon (Alonzo) Hosford
A current Adobe Air Windows OS project I am developing requires printing a Adobe PDF file without user interaction or at the minimum pressing a simple print button without seeing a print dialog window. This is often called silent printing.
Adobe Reader prior to version 8 allowed silent printing from the command line. You find references throughout the internet AcroRd32.exe /N /T PdfFile PrinterName [PrinterDriver[PrinterPort]] However for security this was changed to require the user to finish the printing. If you are developing a kiosk as I am, we want to avoid users having to know how to use printer dialogs or Adobe Reader menus.

[ad name=”Google Adsense”]

Javascript Injection
In researching the alternatives I found the ability to insert Javascript into the PDF file you want to print. This requires Adobe Acrobat Pro and a manual effort of a highly technical nature. I tried this and for a once in while PDF file it is acceptable, but not suited for dynamically third party software generated PDF files or PDF files from multiple sources. Plus it still would require AIR showing the HTMLLoader wrapping the Adobe Reader. You can review this alternative in Adobe Cookbooks.

Other alternatives were command line implementations offered by PDF software companies. These would allow using the NativeProcess in Adobe AIR to execute the printing without user intervention or allow designing a simple user interface like a big print button.

PDFPrint
A decent command line solution was PDFPrint from VeryPDF. Price is $199 (US) per installation. The trial version seemed to work well cobbled by a watermark and page count limitation, but the price forced me to press on.

printto.exe
I came across printto.exe from BioPDF. The printto.exe program uses the default application set by the Windows OS which is Acrobat Reader for PDF. This actually works but it does leaves Acrobat Reader open. I did not try it with other Acrobat Reader clones. Still you can use it, works with any file and it is free free.

GhostScript
Another choice is GhostScript. This works well once you select a “device”. You need to install it and run from the installation directory. I put it on a Windows XP machine and the command line was "C:\Program Files\gs\gs8.71\bin\gswin32c.exe" "@printtestgscmdline.txt" The argument @printtestgscmdline.txt is a way to feed the arguments from a file. The arguments I used are -sDEVICE="printer-device-id" -dNOPAUSE "full-path-to-pdf/your.pdf" -c quit. To get the valid printer device id you can get a list by starting ghostscript interactive mode and typing devicenames ==. I passed on this as I could not get the silencing arguments to work if you copied the installation directory executable files to another directory or machine. I needed something more portable. Also I am not sure of the PDF currency of the software.

Acrobat Wrapper version 2.0.0.23
The one I settled on that is free for non-commercial use. The program file name is acrowrap.exe and called Acrobat Wrapper version 2.0.0.23. You can download and use it without any watermarks or page limits. For commercial use you need to buy PDF Writer at $29 (US) per user with price cuts starting with 2 users; but you do not have to install that. Acrobat Wrapper downloads and installs on its own. Once installed you can take the acrowrap.exe from the installation directory and place it in any folder or computer and it happily runs from the command line. Thus for our commercial use we will buy licenses of PDF Writer for each copy of acrowrap.exe we install on our kiosks. The one drawback is when the printing is delayed the Adobe Reader window appears in a ghostly fashion but not accessible by the user.

You folks at BioPDF should make Acrobat Wrapper a product and simplify so that you do not have to install to get the executable. Also if you can keep Acrobat Reader minimized, that would be sweet.

[ad name=”Google Adsense”]

Using Acrobat Wrapper
The following is a demonstration of how to use Acrobat Wrapper with a NativeProcess Adobe Air application. In this example the user will hit the print button. If your file is generated or downloaded automatically for the user, you can go directly to printing without further user interaction.

I added some options like full screen and always in front for a kiosk type of installation. See code lines 29 and 30 respectively for settings and 46 to 54 for the implementation.

Create an Air project in Flex Builder and paste the code below into the main application mxml.

You need to download and install Acrobat Wrapper on any Windows computer. Then create a folder in your Flex application under the “src” folder and name it the name “native_apps” shown on code line 19 or provide your own folder name. Copy to this folder the acrowrap.exe file from the installation directory that Acrobat Wrapper placed it. For example on a Windows XP computer it was C:\Program Files\bioPDF\Acrobat Wrapper.

Add a sub folder named “in” or a name of your choice on code line 24. The “in” folder will hold your PDF file named on code line 23.

Testing Hints
In testing you will find that if it fails there is no feedback from acrowrap.exe we can pickup from the exit event handler. The exit code is 0 when it prints or fails to print. Thus the best debugging is to create a batch file and mimic what is happening in the AIR application until you find the solution. For example double back slashing and having the “/t” typed as “\t” were problems I encountered.

Also you need Acrobat Reader installed.

Download Flex Builder 4 Project File

<?xml version="1.0" encoding="utf-8"?>
<!--
    Purpose: Demonstrate NativeProcess printing PDF with arcowrap from BioPDF
	Author: Lon Hosford www.lonhosford.com 908 996 3773
	Date: August 12, 2010

-->
<s:WindowedApplication xmlns:fx="http://ns.adobe.com/mxml/2009" 
					   xmlns:s="library://ns.adobe.com/flex/spark" 
					   xmlns:mx="library://ns.adobe.com/flex/mx"
					   height = "500"
					   applicationComplete="applicationCompleteHandler(event)"
					   >
	<fx:Script>
		<![CDATA[
			import mx.controls.Alert;
			import mx.events.FlexEvent;
			import mx.managers.CursorManager;
			private const NATIVE_APP_REL_PATH:String = "native_apps"; 	// Relative to applicationDirectory
			private const PDF_PRINT_APP_FILE_NAME:String = "acrowrap.exe"; 
			private const PDF_PRINT_APP_SWITCH:String = "/t"; 			// Required switch for acrowrap.exe
																		// to close Adobe Reader.
			private const PDF_FILE_NAME:String = "readme.pdf";			// Const for demo only. Var is ok.
			private const PDF_FILE_REL_PATH:String = "in";				// Relative to applicationDirectory
			private const PRINTER_NAME:String = "";						// Blank will use default printer
																		// Network printer double backslash
																		// Ex:\\\\ServerName\\PrinterName
		
			private var displayFullScreen:Boolean = true;				// Full screen state
			private var displayAlwaysInFront:Boolean = true;			// Always in front state
			
			// Language localization
			private var lang_Attention:String = "Attention";
			private var lang_NativeNotSupported:String = "NativeProcess not supported. Flash Version: ";
			private var lang_IsWindowsOSOnly:String = " is a Windows OS only program.";
			[Bindable]
			private var lang_PrintPDFBtnLabel:String = "Print PDF";
			[Bindable]
			private var lang_ClearBtnLabel:String = "Clear";
			[Bindable]
			private var lang_ConsoleLabel:String = "Console:";
			protected function applicationCompleteHandler(event:FlexEvent):void
			{
				console(className + ".applicationCompleteHandler(...)");
				// Display full screen
				if (displayFullScreen)
				{
					stage.displayState = StageDisplayState.FULL_SCREEN;
				}
				// Make this application always in front 
				if (displayAlwaysInFront)
				{
					this.alwaysInFront = true;
				}
				// NativeProcess not supported
				if (!NativeProcess.isSupported)
				{
					showNativeProcessUnsupported();
				}
			}
			/* ========================================================================
				NativeProcess
			======================================================================== */
			/**
			 * Print the pdf
			 * */
			public function printPDF():void
			{	 
				var process:NativeProcess;
				var backSlashPattern:RegExp = /\\/g;
				var exeFileName:File;
				var printFileName:String;
				var processArgs:Vector.<String>;
				
				setUIStateToPrinting();
				
				// Windows OS
				if (Capabilities.os.toLowerCase().indexOf("win") > -1)
				{
					// Create File object of the application directory
					exeFileName = File.applicationDirectory;
					// Refine the file object to the NativeApps subdirectory of application directory
					exeFileName = exeFileName.resolvePath(NATIVE_APP_REL_PATH);
					// Refine the file object the application file name
					exeFileName = exeFileName.resolvePath(PDF_PRINT_APP_FILE_NAME);
					printFileName = exeFileName.nativePath.substr(0, exeFileName.nativePath.indexOf(exeFileName.name))  +  PDF_FILE_REL_PATH + "\\" + PDF_FILE_NAME;
					printFileName = printFileName.replace(backSlashPattern, "\\\\")	;
					console("Printing " + printFileName);
					processArgs = new Vector.<String>();
					processArgs.push(PDF_PRINT_APP_SWITCH); 
					processArgs.push(printFileName); 
					processArgs.push(PRINTER_NAME); 
						
					var nativeProcessStartupInfo:NativeProcessStartupInfo;
					nativeProcessStartupInfo = new NativeProcessStartupInfo();
					nativeProcessStartupInfo.arguments = processArgs ; 
					nativeProcessStartupInfo.executable = exeFileName  ;
					
					
					console("Executing " + nativeProcessStartupInfo.executable.nativePath);
					console("Arguments " + nativeProcessStartupInfo.arguments.toString());
					
					// Create NativeProcess, create listeners and start.
					process = new NativeProcess();
					process.addEventListener(NativeProcessExitEvent.EXIT, nativeProcessExitEventHandler);
					process.addEventListener(IOErrorEvent.STANDARD_ERROR_IO_ERROR, ioEventHandler);
					process.start(nativeProcessStartupInfo);
					this.focusManager.showFocus();
				}
				else 
				{
					showUnsupportedOS();
				}
			}
			/**
			 * Signals the native process has exited. The exitCode property contains the 
			 * value the process returns to the host operating system on exit. 
			 * If the AIR application terminates the process by calling the exit() 
			 * method of the NativeProcess object, the exitCode property is set to NaN. 
			 * */
			public function nativeProcessExitEventHandler(event:NativeProcessExitEvent):void
			{
				console(className + ".nativeProcessExitEventHandler(...) - Process exited with " + event.exitCode);
				setUIStateToReady();
			}
			/**
			 * Signals that reading from the standard error (stderror) stream has failed. 
			 * */
			public function ioEventHandler(event:IOErrorEvent):void
			{
				console(className + ".ioEventHandler(...) - IOError - " + event.toString());
				setUIStateToReady();
			}
			/* ========================================================================
				UI 
			======================================================================== */
			/**
			 * Set the UI ready state. Not printing.
			 * */
			public function setUIStateToReady():void
			{
				print_btn.enabled = true;
				CursorManager.removeBusyCursor();
			}
			/**
			 * Set the UI printing state.
			 * */
			public function setUIStateToPrinting():void
			{
				print_btn.enabled = false;
				CursorManager.setBusyCursor();
			}
			/**
			 * Show unsupported OS.
			 * */
			public function showUnsupportedOS():void
			{
				Alert.show( PDF_PRINT_APP_FILE_NAME + lang_IsWindowsOSOnly, lang_Attention);
				setUIStateToReady()
			}
			/**
			 * Show native process unsupported.
			 * */
			public function showNativeProcessUnsupported():void
			{
				Alert.show( lang_NativeNotSupported + Capabilities.version, lang_Attention);
			}
			/**
			 * Clear the console
			 * */
			public function clearConsole():void
			{
				console_ta.text = "";
			}
			/**
			 * Append to the console
			 * */
			public function console(msg:String):void
			{
				trace(msg);
				console_ta.text += msg + "\n";
			}
		]]>
	</fx:Script>
	<s:VGroup width="100%" height = "100%" >
		<s:Button id = "print_btn" label="{lang_PrintPDFBtnLabel}" click="printPDF()"/>
		<s:Label text="{lang_ConsoleLabel}" textAlign="left"/>
		<s:TextArea id="console_ta" height = "100%" width="100%"/>
		<s:Button label="{lang_ClearBtnLabel}" click="clearConsole()"/>
	</s:VGroup>
</s:WindowedApplication>


Categories
Articles

Amazon Web Service (AWS) Signed Request Using PHP For Flex HTTPService

By Lon (Alonzo) Hosford

I am in the process of updating my Flex Caringorm example that makes an ItemSearch operation to Amazon AWS to fetch data. AWS changed the security August 2009 to include a secret key value. Using this you need to create Signature parameter. You also need a Timestamp parameter.

The Signature parameter you need to generate and they have a utility helper to demonstrate should you need it.

[ad name=”Google Adsense”]

There is an Actionscript example of how to generate the signed request at Brendon Wilson’s blog. I did not try it. There is a discussion in the blog comments about placing the security key in the Actionscript code. The idea of a security key implies it is to be protected. Placing it in the Actionscript code is not wise because there are tools that can open the contents of a published swf.

Another plan is to store all the AWS information on a server and place the signature code there. So this is an example on how to do that with PHP. The AWS access ID and secret key are removed from the client side and are better protected. The secert key is in plain text and as such you may want to take more action to protect that if you think the PHP script is vulnerable.

Here is the PHP version of signing an AWS request. I had to cobble various examples I found and added the references at the end of this blog article. This example designed to work with Flex HTTPService and returns XML. The script allows placing test AWS parameters in the file for testing with a browser. You might want to try other AWS operations and parameters.

Configuration is easy. Lines 9 and 10 require your AWS codes. That is it.

To generate an error from AWS keep $useTestData on line 18 as false and run the script in a web browser. Your response will show AWS balking at a missing parameter because nothing is being sent for it to process. To see a positive result change $useTestData to true and the supplied test data will produce a nice pile of XML.

<?php
/**
*  Creats AWS request and signs the request
*  Wraps AWS response in user defined XML. 
*  To test add your AWS access key code ID and secrete access key and set $useTestData = true;
*/
header ("content-type: text/xml");
// Configurable values
$public_key = "{PLACE YOUR AWS ACCESS KEY HERE}";	// AWS access key code ID
$private_key = "{PLACE YOUR AWS SECRET KEY HERE}";	// AWS secret access key)
$amazonErrorRootNode = "<Errors";					// First node with < from amazon for error  response.


// Developer values
$version = "v.01.00.00";						// Version of this script

// Debugging values
$debug = false;								// Debugging status
$useTestData = false;							// Use embedded testing data

// Program controlled values
$success = "false";							// Default success value. 
$params = array();							// The parameters to pass to AWS 
$returnXML = "";								// XML returned

if ($useTestData)
{
	$params =  array(	"Operation"=>"ItemSearch",
                        "Keywords"=>"Beatles Abbey Road", 
                        "Service"=>"AWSECommerceService", 
                        "Sort"=>"salesrank", 
                        "SearchIndex"=>"Music", 
                        "Count"=>"25", 
						"ResponseGroup"=>"Medium,Tracks,Offers");
}
else
{
	$params = $_REQUEST;
}

$returnXML .= "<response>";

$returnXML .= "<version>";
$returnXML .= $version;
$returnXML .= "</version>";
if ($debug)
{
	$returnXML .= "<isTestData>";
	$returnXML .= $useTestData ? "true":"false";
	$returnXML .= "</isTestData>";
}

function aws_signed_request( $public_key, $private_key, $params)
{
	$method = "GET";
	$host = "ecs.amazonaws.com";  
	$uri = "/onca/xml";
	
	$timestamp = gmstrftime("%Y-%m-%dT%H:%M:%S.000Z");
	$timestamp = "&Timestamp=" . rawurlencode($timestamp);
	
	$params["AWSAccessKeyId"] = $public_key;
	
	$workurl="";
    foreach ($params as $param=>$value)
    {
		$workurl .= ((strlen($workurl) == 0)? "" : "&") . $param . "=" . rawurlencode($value);
    }
	//$workurl = str_replace(" ","%20",$workurl);
	$workurl = str_replace(",","%2C",$workurl);
	$workurl = str_replace(":","%3A",$workurl);
	$workurl .= $timestamp;
	$params = explode("&",$workurl);
	sort($params);
	
	$signstr = "GET\n" . $host . "\n/onca/xml\n" . implode("&",$params);
	$signstr = base64_encode(hash_hmac('sha256', $signstr, $private_key, true));
	$signstr = rawurlencode($signstr);
	$signedurl = "http://" .$host . $uri . "?" . $workurl  . "&Signature=" . $signstr;
	return $signedurl;
}

// Make the signed url for AWS
$signedurl = aws_signed_request( $public_key, $private_key, $params);

if ($debug)
{
	$returnXML .= "<signed_url>";
	$returnXML .= $signedurl;
	$returnXML .= "</signed_url>";
}

// Make request to AWS
$response = @file_get_contents($signedurl);

// The file_get_contents has failed. See PHP documentation for that.
if ($response === false) // Equal and same data type
{
	$success = "false";
}
// AWS returned a response
else
{
	$returnXML .= "<results>";
	// AWS did not return an error code
	if (strpos($response, $amazonErrorRootNode) == 0)
	{
		$success = "true";
	
		$returnXML .= substr($response, strpos($response, "?>")+2); // Strip Amazon XML header
	}
	// AWS returned an error code	
	else
	{
		$success = "false";
		$returnXML .= substr($response, strpos($response, "?>")+2); // Strip Amazon XML header
	}
	$returnXML .= "</results>";

}

$returnXML .= "<success>";
$returnXML .= $success;
$returnXML .= "</success>";

$returnXML .= "</response>";

echo $returnXML;

?>

References

Categories
Articles

Flex Asteriods Game Ship Animation

By Lon (Alonzo) Hosford

This example is based on Keith Peters ground breaking book on animation for ActionScript 3, Foundation Actionscript 3.0 Animation: Making Things Move.

Keith lays out the basic fundamentals of motion. A great start point example to understand velocity, friction, acceleration and direction is the Asteroids game style ship moving through space. I also reproduced a similar example using HTML5 canvas you can view here: HTML5 Canvas Based Animation Asteriods Space Ship Movement

Keith Peters AS3 Animation
Learn More

Many similar examples just assume you are going to use the keyboard to control the ship. This example decouples the ship acceleration and movement from keyboard. However we then double back and use the keyboard to control the ship. You will see in the MXML Application code, the keyboard events call methods on the ArrowShip class. However you could provide buttons for mouse clicks or even go crazy with a multi-touch application.

The example is created in Flex Builder Running Eclipse but can be adapted to AIR or Flash. Download the example code. You can also use Flash CS3 and CS4. You need create a Flash document in the src directory and set AsteriodsShipMovement as you document class. You also need to include the Flex 3 library, the Flex.swc file, into your Actionscript 3 settings. Tareq AlJaber article shows how that is done on page two of his article Embedding metadata with Flash. For your convenience you can download a Flash CS4 file that is set up, but still you may need to check the Actionscript 3 settings if the movie will not play because you might have a non-standard installation. Download the Flash CS4 example.

You can use any graphic for the ship. More on how to do that is noted on the comments for ArrowShip class code.

I added lots of comments in the code. The following is an overview of each code piece.

The AsteroidsShipMovement class is the main class to start the example. Line 17 is where you set the size and speed of your Flash movie.

The background is a simple shape. You can embellish to your preference. See line 34.

The ship needs a mask to define when it leaves view. That can be any size but generally is the same size as the stage or smaller. Thus your flying area can be smaller. The mask must be a rectangle. See line 38.

AsteroidsShipMovement.as

package
{
.
.
.
	import com.alh.ui.ships.ArrowShip;
	import com.alh.ui.ships.Ship;
	import flash.display.MovieClip;
	import flash.display.Shape;
	import flash.display.Sprite;
	import flash.display.StageScaleMode;
	import flash.events.KeyboardEvent;
	import flash.geom.Rectangle;
	import flash.ui.Keyboard;

	// SET GAME SIZE AND SPEED HERE
	[SWF(width=600, height = 600, frameRate = "30")]

	public class AsteriodsShipMovement extends Sprite
	{
		// Basic game background - set your preference here
		public static const backgroundColor:Number = 0x0000ff;
		public static const backgroundBorderColor:Number = 0x666666;
		public static const backgroundBorderWidth:Number = 2;

		// Create the ship
		private var arrowShip:ArrowShip;
		public function AsteriodsShipMovement()
		{
			// Set stage options
			initStage();

			// Create a background
			var backgroundRect:Shape = getRectShape(backgroundColor, backgroundBorderColor, backgroundBorderWidth, stage.stageWidth, stage.stageHeight)
			addChild(backgroundRect);

			// Create the boundaries for the arrowShip, create the arrowShip.
			var shipMaskRect:Shape = getRectShape(0x000000, 0x000000, backgroundBorderWidth, stage.stageWidth, stage.stageHeight)
			arrowShip = new ArrowShip(shipMaskRect);
			addChild(arrowShip);
			arrowShip.x = shipMaskRect.width / 2;
			arrowShip.y = shipMaskRect.height / 2;

			// Use keyboard events to control the ship
			stage.addEventListener( KeyboardEvent.KEY_DOWN, keyPressed);
			stage.addEventListener( KeyboardEvent.KEY_UP, keyReleased);
		}
		/**
		 * Set any stage options per your needs
		 * */
		private function initStage():void
		{
			stage.scaleMode = StageScaleMode.NO_SCALE;
		}
		/**
		 * Handler for KeyboardEvent.KEY_DOWN
		 * */
		private function keyPressed(evt:KeyboardEvent):void
		{
			// Either accelerate or turn the ship
			switch (evt.keyCode)
			{
				case Keyboard.UP:
					arrowShip.accelerate(Ship.START);
					break;
				case Keyboard.LEFT:
					arrowShip.turn(Ship.LEFT, Ship.START);
					break;
				case Keyboard.RIGHT:
					arrowShip.turn(Ship.RIGHT, Ship.START);
					break;
			}
		}

		/**
		 * Handler for KeyboardEvent.KEY_UP
		 * */

		private function keyReleased(evt:KeyboardEvent):void
		{
			// Either stop accelerating or stop turning the ship
			switch (evt.keyCode)
			{
				case Keyboard.UP:
					arrowShip.accelerate(Ship.STOP);
					break;
				case Keyboard.LEFT:
					arrowShip.turn(Ship.LEFT, Ship.STOP);
					break;
				case Keyboard.RIGHT:
					arrowShip.turn(Ship.RIGHT, Ship.STOP);
					break;
			}
		}
		/**
		 * Utility to draw a rectangle Shape object
		 * */
		private function getRectShape(bgColor:uint, borderColor:uint, borderSize:uint, width:uint, height:uint):Shape
		{
			var newShape:Shape = new Shape();
			newShape.graphics.beginFill(bgColor);
			newShape.graphics.lineStyle(borderSize, borderColor);
			newShape.graphics.drawRect(0, 0, width, height);
			newShape.graphics.endFill();
			return newShape;
		}

	}
}

The ArrowShip class is a subclass of the Ship class. The Ship class does all the common functions for ship objects. The ArrowShip class is basically the skin. You subclass the Ship class and add your ship image on line 11.

ArrowShip.as

.
.
.
package com.alh.ui.ships
{
	import flash.display.DisplayObject;

	public class ArrowShip extends Ship
	{

		[Embed(source="/assets/ArrowShip.png")]
		private var ShipImg:Class;
		private var a:int;
		/**
		 * Constructor
		 * param maskRect represents the container boundaries for the ship and its mask
		 * */
		public function ArrowShip(maskRect:DisplayObject) : void
		{
			super(maskRect);
			super.addShipImage(new ShipImg(),270);

		}
	}
}

The Ship class implements the animation direction, velocity, friction, and acceleration principles set out in Keith Peters’ book, Foundation Actionscript 3.0 Animation: Making Things Move!.
Instead of including Keyboard movement in the class as many animators do, the accelerate and turn methods were included. The UI or any code can call these methods to control the ship. On a more advanced level you could create an interface to further specify these methods in all types of objects that move forward and turn.

Ship.as

.
.
.
package com.alh.ui.ships
{

	import flash.display.DisplayObject;
	import flash.display.MovieClip;
	import flash.display.Sprite;
	import flash.events.Event;

	/**
	 * Generic class for a space ship moving through space
	 * This class is intended to be abstract
	 * */
	public class Ship extends MovieClip
	{

		private var _shipDirectionOffset:Number = 0; 	// Offset front of ship in artwork in degrees.
														// Artwork may have the ship facing in different
														// directions and this makes the adjustment
														// 0 = artwork ship faces right. 270 faces up.
		private var _speed:Number = 0.3;				// Acceleration increment
		private var _rotateSpeed:Number = 3;			// Turning speed in degrees
		private var _vx:Number = 0;						// Velocity for x (direction and speed)
		private var _vy:Number = 0;						// Velocity for y(direction and speed)
		private var _friction:Number = 0.95;			// Percent reduction in _vx and _vy
		private var _accelerate:Boolean = false;		// True if increasing _vx and _vy, false if not
		private var _turnLeft:Boolean = false;			// Right turn direction request
		private var _turnRight:Boolean = false;			// Object has right turn direction request

		public static const START:int = 0;				// Start moving or turning
		public static const STOP:int = 1;				// Stop moving or turning
		public static const LEFT:int = 0;				// Turn left
		public static const RIGHT:int = 1;				// Turn right

		/**
		 * Constructor
		 * param maskRect represents the container boundaries for the ship and its mask
		 * */
		public function Ship(maskRect:DisplayObject) : void
		{
			mask = maskRect;
			// Register handler for Event.ENTER_FRAME
			addEventListener(Event.ENTER_FRAME, enterFrameEventHandler, false, 0, true);
		}
		/**
		 * Add the ship image and its directional offset
		 * param imgClass is the artwork
		 * param shipDirectionOffset see _shipDirectionOffset for notes
		 * */
		internal function addShipImage(imgClass:DisplayObject, shipDirectionOffset:Number):void
		{
			_shipDirectionOffset = shipDirectionOffset;
			// Add in ship image
			var shipSprite:Sprite = new Sprite();
			shipSprite.addChild(imgClass);

			// Add ship sprite and center
			addChild(shipSprite);
			shipSprite.x = shipSprite.width / 2* -1;
			shipSprite.y = shipSprite.height / 2 * -1;

		}
		/**
		 * Accelerates ship or stops acceleration
		 * param startStopState valid values START and STOP
		 * */
		public function accelerate(startStopState:int):void
		{
			// Set the accelerating state
			_accelerate = startStopState == START;
		}
		/**
		 * Turn ship
		 * param turnDirection valid values LEFT and RIGHT
		 * param startStopState valid values START and STOP
		 * */
		public function turn(turnDirection:int, startStopState:int):void
		{
			// Set the left turn state
			if (turnDirection == LEFT)
			{
				_turnLeft = startStopState == START;
			}
			// Set the right turn state
			if (turnDirection == RIGHT)
			{
				_turnRight = startStopState == START;
			}
		}
		/**
		 * Event.ENTER_FRAME event handler
		 * */
		protected function enterFrameEventHandler(e:Event) : void
		{
			// Acceleration is on
			if (_accelerate )
			{
				// Conversion of rotation degrees (rotation + _shipDirectionOffset) and speed to velocity
				_vy += Math.sin(degreesToRadians(rotation + _shipDirectionOffset)) * _speed;
				_vx += Math.cos(degreesToRadians(rotation + _shipDirectionOffset)) * _speed;
			}
			// Acceleration is off
			else
			{
				// reduce velocity by friction
				_vy *= _friction;
				_vx *= _friction;
			}

			// Change direction right
			if (_turnRight)
			{
				rotation += _rotateSpeed;
			}
			// Change direction left
			else if (_turnLeft)
			{
				rotation += -_rotateSpeed;
			}

			// Move position by velocity
			y += _vy;
			x += _vx;

			// Exiting right side of mask
			if (x - width / 2 > mask.width)
			{
				x = 0;
			}
			// Exiting left side of mask
			else if (x + width / 2 < 0)
			{
				x = mask.width;
			}

			// Exiting top of mask
			if (y - height / 2 > mask.height)
			{
				y = 0;
			}
			// Exiting bottom of mask
			else if (y + height / 2 < 0)
			{
				y = mask.height;
			}
		}
		/**
		 * Change the default friction value
		 * */
		protected function set friction(friction:Number):void
		{
			_friction = friction;
		}
		/**
		 * Change the default speed value
		 * */
		protected function set speed(speed:Number):void
		{
			_speed = speed;
		}
		/**
		 * Change the default rotateSpeed value
		 * */
		protected function set rotateSpeed(rotateSpeed:Number):void
		{
			_rotateSpeed = rotateSpeed;
		}
		/**
		 * Utility to convert Actionscript degrees (0-360) to Trig radians (57.2958 degrees).
		 * */
		private function degreesToRadians(degrees:Number) : Number
		{
			return degrees * Math.PI / 180;
		}

	}

}

Categories
Articles

Adobe AIR (P2P) Peer To Peer Text Chat with NetGroup

By Lon (Alonzo) Hosford

This is a minimalist example of an Adobe AIR peer to peer text chat application using the NetGroup class for peer communication. Create an new AIR application and replace all the code with the code below.

[ad name=”Google Adsense”]

You need to change line 15 to include your own Adobe Stratus developer key. You can use the Adobe Stratus server by obtaining a developer key at Adobe Labs.

On line 16 you need to create a name for your group. You want something unique so consider a reverse domain prefix such as com.yourdomain plus an application name and something unique. For example com.bugsbunny.carrot-chat.b7-4d;8k9.

You can also make this a Flex application. Create a flex application and paste all but the WindowedApplication MXML tags between your Application MXML tags.

The application starts once the user clicks the connect button. This establishes a connection with the Adobe Stratus server on line 51. Once the connection is successful, ncNetStatus(…) handler receives a NetConnection.Connect.Success event code and calls the setupGroup() method on line 100. The setupGroup() method creates the requisite specification to join the group you identified in line 16.

Once the user selects the user name and clicks connect, the user name cannot be changed. That is an application design choice on line 190 with the enabled property for the user_ti TextInput component. However you might notice the new Flex 4 two way binding used for the userName variable and the user_ti TextInput component text property on line 190. If you want to change the user name after the connection just remove the enabled property on line 190.

.
.
.
<?xml version="1.0" encoding="utf-8"?>
<s:WindowedApplication xmlns:fx="http://ns.adobe.com/mxml/2009"
					   xmlns:s="library://ns.adobe.com/flex/spark"
					   xmlns:mx="library://ns.adobe.com/flex/mx"
					   creationComplete="creationCompleteHandler(event)"
					   height="600" width="800"
					   >
	<fx:Script>
		<![CDATA[
			import mx.events.FlexEvent;
			private const SERVER:String = "rtmfp://stratus.adobe.com/";
			private const DEVKEY:String = "{YOUR ADOBE STRATUS DEVELOPER KEY}";
			private const NETGROUP:String = "{YOUR NETGROUP NAME}";
			private var _nc:NetConnection;
			private var _netGroup:NetGroup;

			// NetGroup specifier for NETGROUP
			[Bindable]
			private var groupSpecWithAuthorizations:String;

			// Connected to Stratus server and to NETGROUP
			[Bindable]
			private var _connected:Boolean = false;

			// _userName name in chat.
			[Bindable]
			private var _userName:String;

			// Used to store our P2P Peer ID for binding to UI.
			[Bindable]
			private var _nearID:String;

			// Counter to make every NetGroup post message unique
			private var _msgOutCount:int = 0;

			/**
			 * CreationComplete event handler for WindowedApplication
			 * */
			protected function creationCompleteHandler(event:FlexEvent):void
			{
				console (className + ".creationCompleteHandler(...) - Capabilities.version:" + Capabilities.version);
				// Generate a default user name;
				_userName = "user" +  Math.round(Math.random()*10000);
			}
			/**
			 * Connect with Stratus server
			 * */
			private function connect():void
			{
				_nc = new NetConnection();
				_nc.addEventListener(NetStatusEvent.NET_STATUS,ncNetStatus);
				_nc.connect(SERVER+DEVKEY);
			}
			/**
			 * NetStatusEvent.NET_STATUS event handler for _nc and _netGroup
			 * */
			private function ncNetStatus(event:NetStatusEvent):void
			{
				console( className + ".ncNetStatus(...) - event.info.code:" + event.info.code);

				switch(event.info.code)
				{
					case "NetConnection.Connect.Success":
						_nearID = _nc.nearID;// or you can use event.target.nearID;
						setupGroup();
						break;
					case "NetGroup.Connect.Success":
						_connected = true;
						break;
					case "NetGroup.Posting.Notify":
						receivePostNotifyMessage(event.info.message);
						break;
					// FYI: More NetGroup event info codes
					case "NetGroup.Neighbor.Connect":
					case "NetGroup.LocalCoverage.Notify":
					case "NetGroup.SendTo.Notify": // event.info.message, event.info.from, event.info.fromLocal
					case "NetGroup.MulticastStream.PublishNotify": // event.info.name
					case "NetGroup.MulticastStream.UnpublishNotify": // event.info.name
					case "NetGroup.Replication.Fetch.SendNotify": // event.info.index
					case "NetGroup.Replication.Fetch.Failed": // event.info.index
					case "NetGroup.Replication.Fetch.Result": // event.info.index, event.info.object
					case "NetGroup.Replication.Request": // event.info.index, event.info.requestID
					default:
					{
						break;
					}
				}
			}

			// ========================================
			//  NETGROUP Methods
			// ========================================

			/**
			 * Connect with the NETGROUP
			 * */
			private function setupGroup():void
			{
				console( className + ".setupGroup()");
				var groupspec:GroupSpecifier = new GroupSpecifier(NETGROUP);
				// Allow group members to open channels to server
				groupspec.serverChannelEnabled = true;
				// Allow group members to post
				groupspec.postingEnabled = true;

				// Create the group specifi
				groupSpecWithAuthorizations = groupspec.groupspecWithAuthorizations();

				// Join the group specified by groupspec
				_netGroup = new NetGroup(_nc, groupSpecWithAuthorizations);

				// Register listener for NetGroup NetStatus events
				_netGroup.addEventListener(NetStatusEvent.NET_STATUS, ncNetStatus);
			}
			/**
			 * Post a message to NETGROUP;
			 * @param messageText String. Text message to send.
			 * */
			private function sendMessageToGroup(messageText:String):void
			{
				console( className + ".sendMessageToGroup(...) - messageText:" + messageText);
				// Construct message object
				var netGroupMessage:Object = new Object();
				netGroupMessage.sender = _netGroup.convertPeerIDToGroupAddress(_nc.nearID);
				netGroupMessage.user = _userName;
				netGroupMessage.text = messageText;
				netGroupMessage.sequence = ++ _msgOutCount;// Only unique message objects are sent.
				// Send netGroupMessage object to all members of the NETGROUP
				_netGroup.post(netGroupMessage);
			}
			/**
			 * Receive a NetGroup.Posting.Notify message from NETGROUP
			 * @param netGroupMessage Object. NetGroup post message object.
			 * */
			private function receivePostNotifyMessage(netGroupMessage:Object):void
			{
				updateUI(netGroupMessage.user, netGroupMessage.text)
 			}

			// ========================================
			//  UI Methods
			// ========================================

			/**
			 * Join chat group
			 * */
			private function joinChat():void
			{
				// Connect to server
				connect();
			}
			/**
			 * Post a message to NETGROUP;
			 * */
			private function sendMessage():void
			{
				// Send message to NetGroup
				sendMessageToGroup(message_ti.text);
				// Update local view of message sent
				updateUI(_userName, message_ti.text);
			}
			/**
			 * Update UI with message object received from NETGROUP
			 * @param userName String. Name of user sending message.
			 * @param messageText String. Text of message to sent.
			 * */
			private function updateUI(userName:String, messageText:String):void
			{
				chat_ta.appendText( userName + ": " + messageText + "\n");
			}

			private function console(msg:String):void
			{
				trace(msg);
				out_ta.appendText(msg + "\n");
			}
		]]>
	</fx:Script>
	<s:layout >
		<s:VerticalLayout horizontalAlign="left"
						  paddingLeft="10" paddingTop="10" paddingRight="10" paddingBottom="10"/>
	</s:layout>
	<!--UI For Chat-->
	<s:Label text = "Chat log:" />
	<s:TextArea id="chat_ta" height = "120" width="100%"/>
	<s:HGroup width="100%">
		<s:TextInput  id="user_ti" text="@{_userName}" enabled="{!_connected}"/>
		<s:Button label="Connect" click="joinChat()" enabled="{!_connected}" />
		<s:TextInput  id="message_ti"  width="70%" enter="sendMessage()" enabled="{_connected}"/>
		<s:Button label="Send" click="sendMessage()" enabled="{_connected}" />
		<s:Button label="Clear" click="chat_ta.text = '';"   />

	</s:HGroup>

	<!--UI For Tracing P2P-->
	<s:Label text = "P2P Information" paddingTop="20"/>

	<s:HGroup horizontalAlign="left" width="100%" >
		<s:Label text = "Peer Id: " />
		<s:Label id = "peerId_lbl" text = "{_nearID}"/>
	</s:HGroup>

	<s:HGroup horizontalAlign="left" width="100%" >
		<s:Label text = "Group Id: " />
		<s:Label id = "groupId_lbl" text = "{groupSpecWithAuthorizations}" />
	</s:HGroup>

	<s:Label text = "Trace log:" paddingTop="20"/>

	<s:TextArea id="out_ta"  height = "250" width="100%" lineBreak="explicit" fontFamily="_typewriter"/>
	<s:HGroup horizontalAlign="center" width="100%">
		<s:Button label="Clear" click="out_ta.text = '';"   />
	</s:HGroup>
</s:WindowedApplication>

I had experienced some problems with launching the application in Eclipse Flex Builder 4. I had published the application and launched on other computers. The Flex Builder 4 launch would not post to the NetGroup or receive from it if launched before other application instances on other machines. However if it was launched after another application instance was launched, it seemed to post and receive posts.

Categories
Articles

Adobe AIR Native Drag and Drop File Upload With ProgressBar and PHP

This is an example of using Adobe AIR native drag and drop to upload a file to a web server using PHP5. The application only uploads one file at a time and assumes the drag operation is anywhere over the application.

This is the PHP code that will place the file into a folder named upload. The upload folder is a child folder under the folder for the PHP script. On line 13 you need to replace YOUR APPFOLDER with the folder you plan to install the PHP script. This also must be matched in the AIR MXML application.

You also need to set permissions on the upload folder to allow uploading.

The PHP script returns XML.The result.status node provide a true or false value for the success feedback.
file_upload.php

.
.
.
<?php
	$returnXML = "";
	$returnLog = "Receiving upload...\n";
    // Filedata is the default name used in uploading
	$returnLog .= "temporary file name = " . $_FILES['Filedata']['tmp_name']."\n";
	$returnLog .= "file name = " . $_FILES['Filedata']['name']."\n";
	$returnLog .= "file size = " . $_FILES['Filedata']['size']."\n";
	$file_temp = $_FILES['Filedata']['tmp_name'];
	$file_name = $_FILES['Filedata']['name'];
	$file_path = $_SERVER['DOCUMENT_ROOT']."/YOUR APPFOLDER/upload";
	$returnStatus = "false";
	$returnLog .= "attempting to move file...\n";
	if(  move_uploaded_file( $file_temp, $file_path . "/" . $file_name) )
	{
		$returnStatus = "true";
	}

	$returnLog .= "file move results = " . $returnStatus . "\n";
	$returnXML .= "<return>";
	$returnXML .= "<log>";
	$returnXML .= $returnLog;
	$returnXML .= "</log>";
	$returnXML .= "<status>";
	$returnXML .= $returnStatus;
	$returnXML .= "</status>";

	$returnXML .= "</return>";
	echo $returnXML ;

?>

This is the AIR main MXML code. You need to modify line 21 to include the URL to where you want to place the PHP script to handle the file upload.

.
.
.
<?xml version="1.0" encoding="utf-8"?>
<s:WindowedApplication xmlns:fx="http://ns.adobe.com/mxml/2009"
					   xmlns:s="library://ns.adobe.com/flex/spark"
					   xmlns:mx="library://ns.adobe.com/flex/mx"
					   creationComplete="creationCompleteHandler(event)"
					   >
	<fx:Script>
		<![CDATA[
			import flash.desktop.ClipboardFormats;
			import flash.desktop.NativeDragManager;
			import flash.events.DataEvent;
			import flash.events.NativeDragEvent;
			import flash.filesystem.File;

			import mx.controls.Alert;
			import mx.events.FlexEvent;

			private const UPLOAD_SCRIPT_URL:String = "http://www.YOURDOMAIN.com/YOUR APPFOLDER/file_upload.php"

			protected function creationCompleteHandler(event:FlexEvent):void
			{
				console(className + ".creationCompleteHandler(...) - url:" + url );
				addEventListener(NativeDragEvent.NATIVE_DRAG_ENTER, onDragEnterHandler);
				addEventListener(NativeDragEvent.NATIVE_DRAG_DROP, onDragDropHandler);
			}
			/**
			 * Event handler for NativeDragEvent.NATIVE_DRAG_ENTER.
			 * May be called multiple times as file object is dragged over the application.
			 * <p>
			 * Check that there are file objects being dragged and only one file is being dragged.
			 * </p>
			 * */
			private function onDragEnterHandler(e:NativeDragEvent):void
			{
				console(className + ".onDragIn(...)");
				//Does the clipboard have an array of File objects (AIR only)
				if(e.clipboard.hasFormat(ClipboardFormats.FILE_LIST_FORMAT))
				{
					//Get the array of File objects
					var files:Array = e.clipboard.getData(ClipboardFormats.FILE_LIST_FORMAT) as Array;

					//Allow only one file as only supporting one in this application
					if(files.length == 1)
					{
						//Triggers NativeDragEvent.NATIVE_DRAG_DROP event.
						NativeDragManager.acceptDragDrop(this);
					}
				}
			}
			/**
			 * Event handler for NativeDragEvent.NATIVE_DRAG_DROP
			 * Occurs when the file object is dropped over the application
			 * */
			private function onDragDropHandler(e:NativeDragEvent):void
			{
				var urlRequest:URLRequest = new URLRequest();
				urlRequest.url = UPLOAD_SCRIPT_URL + "?cache=" + new Date().getTime();
				console(className + ".onDragDropHandler(...) - urlRequest.url:" + urlRequest.url);
				//Get the array of File objects. The array should only have one entry per onDragEnterHandler(...)
				var files:Array = e.clipboard.getData(ClipboardFormats.FILE_LIST_FORMAT) as Array;

				//Create a File object and register events.
				var file:File = File(files[0]);
				file.addEventListener(Event.COMPLETE, file_CompleteHandler);
				file.addEventListener(Event.OPEN, file_OpenHandler);
				file.addEventListener(DataEvent.UPLOAD_COMPLETE_DATA, file_UploadCompleteDataHandler);
				file.addEventListener(IOErrorEvent.IO_ERROR, file_IOErrorHandler);
				file.addEventListener(HTTPStatusEvent.HTTP_STATUS , file_HTTPStatusHandler);
				file.addEventListener(SecurityErrorEvent.SECURITY_ERROR, file_SecurityErrorHandler);
				file.addEventListener(ProgressEvent.PROGRESS, file_progressHandler);

				console(className + ".onDragDropHandler(...) - file.url:" + file.url);
				console(className + ".onDragDropHandler(...) - file.name:" + file.name);
				console(className + ".onDragDropHandler(...) - file.nativePath:" + file.nativePath);

				try {
					// Start the file upload
					console(className + ".onDragDropHandler(...) - uploading " + file.name + " ...\n" );
					file.upload(urlRequest, "Filedata", false);
				}
				catch (error:Error) {
					console(className + ".onDragDropHandler(...) - Unable to upload file." + file.name);
					console(className + ".onDragDropHandler(...) - error." + error.toString());
				}
			}
			private function file_progressHandler(event:ProgressEvent):void {
				var file:FileReference = FileReference(event.target);
				console(className + ".progressHandler(...) - name=" + file.name + " bytesLoaded=" + event.bytesLoaded + " bytesTotal=" + event.bytesTotal);
				progressBar.setProgress(event.bytesLoaded, event.bytesTotal);
				progressBar.label = "CurrentProgress: " + Math.round( (event.bytesLoaded /event.bytesTotal * 100)) + "%";
			}

			/**
			 * Dispatched when an upload or download operation starts.
			 */
			private function file_OpenHandler(event:Event):void
			{
				console(className + ".file_OpenHandler(...) - event:" + event );
			}
			/**
			 * Dispatched when an upload fails and an HTTP status code is available to describe the failure.
			 */
			private function file_HTTPStatusHandler(event:HTTPStatusEvent):void
			{
				console(className + ".file_HTTPStatusHandler(...) - event:" + event );
			}
			/**
			 * Dispatched when the upload fails for various I/O reasons.
			 */

			private function file_IOErrorHandler(event:IOErrorEvent):void
			{
				console(className + ".file_IOErrorHandler(...) - event:" + event );
			}
			/**
			 * Dispatched when an operation violates a security constraint.
			 */

			private function file_SecurityErrorHandler(event:SecurityErrorEvent):void
			{
				console(className + ".file_SecurityErrorHandler(...) - event:" + event );
			}

			/**
			 * Dispatched when download is complete or when upload generates an HTTP status code of 200.
			 */
			public function file_CompleteHandler(event:Event):void
			{
				console(className + ".file_CompleteHandler(...) file uploaded complete");
			}

			/**
			 * Dispatched after data is received from the server after a successful upload.
			 */
			public function file_UploadCompleteDataHandler(event:DataEvent):void
			{
				var result:XML = new XML(event.data);
				console(className + ".file_UploadCompleteDataHandler(...) - STATUS:" + result.status );
				console(className + ".file_UploadCompleteDataHandler(...) - LOG:\n" + result.log );

			}

			/**
			 * Update the UI trace log
			 */
			private function console(msg:String):void
			{
				trace(msg);
				console_ta.appendText(msg + "\n");
			}

		]]>
	</fx:Script>
	<s:layout>
		<s:VerticalLayout paddingLeft="10" paddingTop="10"/>
	</s:layout>
	<s:Label  text="Adobe AIR Drag and Drop File Upload" fontSize="20" fontWeight="bold"/>
	<s:Line yFrom="10" yTo = "100" xFrom="0" xTo="0" width="100%" height="0"  >
		<!-- Define the border color of the line. -->
		<s:stroke>
			<s:SolidColorStroke color="0x000000" weight="1" caps="square"/>
		</s:stroke>
	</s:Line>

	<mx:ProgressBar id="progressBar" labelPlacement="bottom" minimum="0" visible="true" maximum="100"
					color="0x323232" label="CurrentProgress 0%" direction="right" mode="manual" width="100%"/>

	<s:TextArea  width="100%" height="100%" id="console_ta" fontFamily="_typewriter" lineBreak="explicit"/>
	<s:HGroup horizontalAlign="center" width="100%">
		<s:Button   label="Clear" click="{console_ta.text = '';}"/>
	</s:HGroup>
</s:WindowedApplication>

The AIR application and the PHP script do not check for maximum upload file size allowed. A typical upload limit number imposed by web hosting is the default 2 megabytes. You may be able to increase that number in the php.ini file or the .htaccess file. The latter is the alternative is you have no control over the php.ini file and the code is included here to bump the size up. In any case you are at the mercy of your hosting provider.

.htaccess

php_value upload_max_filesize 10M
php_value post_max_size 10M
php_value memory_limit 128M

In the AIR application you can create a FILE object in the onDragEnterHandler in the same way as the onDragDropHandler and use the file.size parameter for a check. For the PHP script you can use the $_FILES[‘Filedata’][‘size’] value.

Categories
Articles

Adobe Peer to Peer Basic Example For Connecting to Stratus Server

By Lon Hosford

This is the bare bones example to set up a Flex application for connecting to the Adobe Stratus Server and obtaining a unique 256-bit peer id.

[ad name=”Google Adsense”]

The peer id is shared with others using the application for communication as well as their peer id shared with you. This example does not go into those steps but basically you need a means to do that such as using the FMS server or any web server.

The Adobe Stratus Server handles the peer id handshaking between the peer to peer members. The data such as video or files are shared directly between he peers. The Adobe Stratus server is free and various bloggers have indicated its future is becoming part of the FMS server product. You can use the Adobe Stratus server by obtaining a developer key at Adobe Labs. Insert that key in the code at line 16.

This is the code for an Air application which can also be used for a Flex application.

.
.
.
<?xml version="1.0" encoding="utf-8"?>
<!-- Bare bones Adobe Stratus P2P connection and retrieval of an id -->
<s:WindowedApplication xmlns:fx="http://ns.adobe.com/mxml/2009"
			   xmlns:s="library://ns.adobe.com/flex/spark"
			   xmlns:mx="library://ns.adobe.com/flex/mx"
			   creationComplete="creationCompleteHandler(event)">

	<fx:Script>
		<![CDATA[
			import mx.events.FlexEvent;

			private const SERVER:String = "rtmfp://stratus.adobe.com/";
			private const DEVKEY:String = "{YOUR ADOBE STRATUS DEVELOPER KEY}";
			private var stratusConnection:NetConnection;
			protected function creationCompleteHandler(event:FlexEvent):void
			{
				console("============================================");
				console("This is a bare bones example of connecting ");
				console("to the adobe status peer to peer server ");
				console("and obtaining an id. ");
				console("============================================");
				console("creationCompleteHandler") ;

				stratusConnection = new NetConnection();
				stratusConnection.addEventListener(NetStatusEvent.NET_STATUS, stratusConnectionStatusHandler);
				stratusConnection.connect(SERVER+DEVKEY);
			}

			private function stratusConnectionStatusHandler(event:NetStatusEvent):void{
				console("stratusConnectionStatusHandler - event.info.code:" + event.info.code);

				switch (event.info.code)
				{
					case "NetConnection.Connect.Success":
						console("stratusConnectionStatusHandler - nearID:" + stratusConnection.nearID);
						break;
					case "NetConnection.Connect.Failed":
						console("stratusConnectionStatusHandler - connection failed");
						break;
					default:
						console("stratusConnectionStatusHandler - uncaught event.info.code");
						break;
				}
			}
			private function console(msg:String):void
			{
				trace(msg);
				out_ta.appendText(msg + "\n");

			}

		]]>
	</fx:Script>

	<s:TextArea id = "out_ta"
				width = "100%" height = "100%"
				lineBreak="explicit"
				fontFamily="_typewriter"/>
</s:WindowedApplication>

Categories
Articles

Flex 4 HScrollBar or VScrollBar: How to Autohide like Scroller

By Lon Hosford

[ad name=”Google Adsense”]

There are skinning situations you want to simply use the HScrollBar or VScrollBar to handle the scrolling. For example using multiple Scroller components to handle overlapping viewports. That scenario might include a horizontal scroll bar for a TextArea but a vertical scroll bar for the container.

One drawback is that HScrollBar and VScrollBar do not autohide the scroll bars until they are needed for scrolling. The Scroller component does autohide. If the Scroller cannot handle the need such as overlapping viewports, then resorting to HScrollBar and VScrollBar with or without the Scroller may be a possible solution.

A method to handle this is to use the contentWidth and contentHeight properties for a viewport such as the Group component.

.
.
/*

Assume the viewport is a Group or like component with an id of viewportId.
This optionally sets the width to the viewport which may not be needed depending on layout..
*/
<s:HScrollBar  viewport="{viewportId}"  width="{viewportId.width}"  visible="{viewportId.contentWidth > viewportId.width}"   />

/*
Assume the viewport is a Group or like component with an id of viewportId.
This optionally sets the height to the viewport which may not be needed depending on layout.
*/
<s:VScrollBar  viewport="{viewportId}"  height="{viewportId.width}"  visible="{viewportId.contentHeight > viewportId.height}"   />
.
.